
Getting started and creating your project — the foundations for building interactive AI experiences with Adobe App Builder and the Model Context Protocol.
Introduction
AI assistants are moving beyond text-only chat. Users increasingly expect rich, interactive experiences — product carousels, detail views, carts, dashboards — rendered directly inside the conversation. Agentic Apps (built on the MCP Apps extension) deliver exactly that: MCP tools paired with interactive HTML UIs that run inside compatible hosts like Cursor and Claude Desktop.
In this series, we’ll build Agentic Apps on Adobe App Builder, deploying MCP servers to Adobe I/O Runtime — Adobe’s serverless platform with enterprise auth, auto-scaling, and one-command deploys.
Part 1 covers the foundations, walks you through creating your App Builder project, deploys the scaffolded MCP server to I/O Runtime, and connects it to an MCP host for verification. Later parts will cover building the Agentic App UI and extending tools and resources.
What Is an Agentic App?
A standard MCP server exposes tools (callable functions), resources (static content), and prompts (reusable templates). An Agentic App (MCP App) adds a third layer: an interactive UI.
Every Agentic App has three linked pieces:
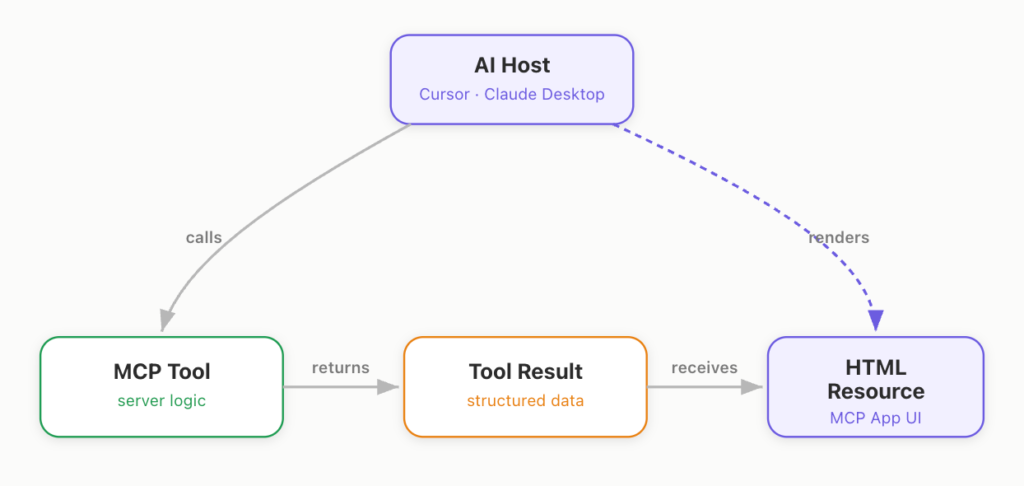
- Tool — Called by the LLM or host; fetches data and returns structured results.
- Resource — Serves bundled HTML (
text/html;profile=mcp-app) that renders the UI. - Link — The tool’s
_meta.ui.resourceUripoints at the resource URI.
When a user asks “Show me products matching vanilla candle”, the host invokes your tool, receives product data, and renders your HTML UI inside the conversation — complete with images, filters, and click actions.
Why App Builder for Agentic Apps?
Running MCP servers locally works for prototyping, but production Agentic Apps need:
| Requirement | App Builder delivers |
|---|---|
| Serverless hosting | Adobe I/O Runtime with auto-scaling |
| Secure credentials | Encrypted env vars — no API keys in client configs |
| Enterprise auth | IMS token validation and API key support built in |
| One-command deploy | aio app deploy ships to production |
| Official MCP SDK | @modelcontextprotocol/sdk + @modelcontextprotocol/ext-apps |
Adobe also provides an official App Builder template — @adobe/generator-app-remote-mcp-server-generic — that scaffolds a production-ready MCP server with tools, resources, prompts, authentication, and Streamable HTTP transport.
Architecture at a Glance
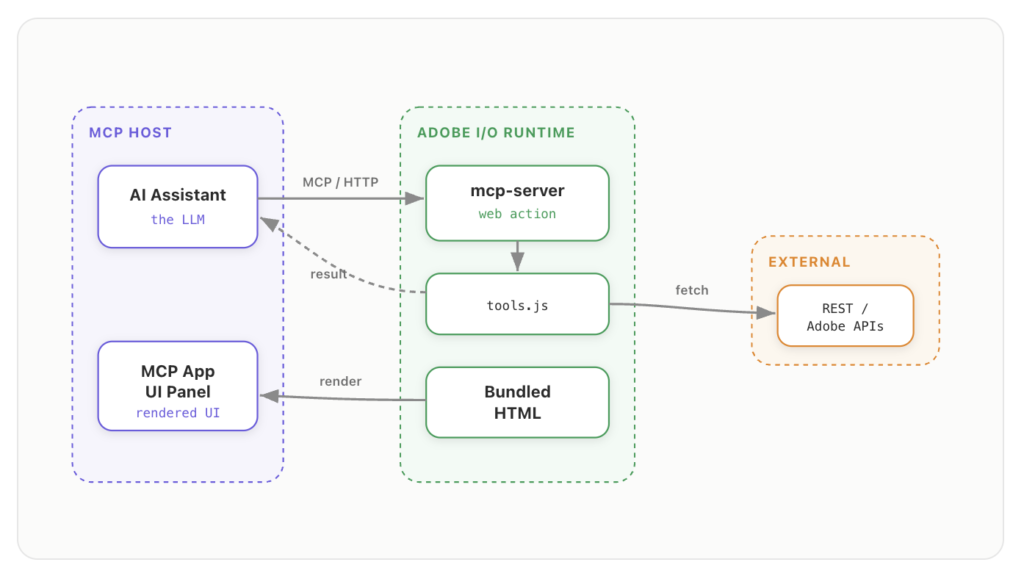
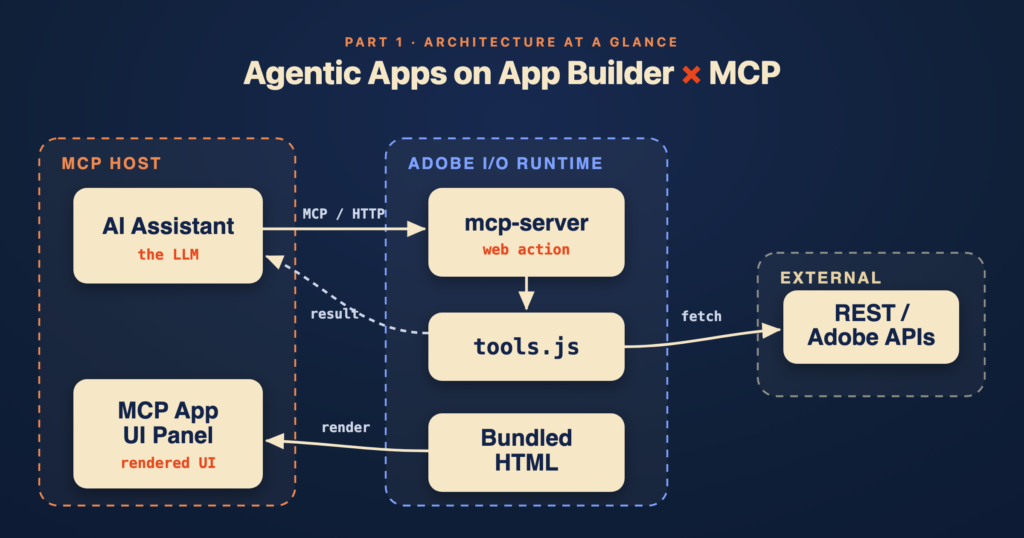
The MCP server runs as a web action on I/O Runtime. Each request creates a fresh, stateless server instance — ideal for serverless. The bundled HTML is served as an MCP resource and rendered by the host.
Prerequisites
Before creating your project, ensure you have:
| Requirement | Details |
|---|---|
| Node.js | Version 18.19 or later |
| Adobe I/O CLI | App Builder command-line tool (aio) |
| Adobe Developer Console account | developer.adobe.com/console |
| I/O Runtime enabled | A Developer Console project with Runtime added |
1. Create an Adobe Developer Console Project
- Go to the Adobe Developer Console.
- Click Create new project → Create an empty project.
- Name your project (e.g.
my-agentic-app). - Click Add API → select I/O Runtime → Next → Save configured API.
- Add a Workspace (e.g.
Development) if prompted.
Your project now has a serverless runtime namespace where MCP actions will deploy.
2. Install the Adobe I/O CLI
Install the CLI globally:
npm install -g @adobe/aio-cliVerify the installation:
aio --versionLog in to your Adobe account:
aio loginThis opens a browser for IMS authentication and links the CLI to your Developer Console projects.
3. Generate Your MCP Server Project
Initialize a new App Builder project:
aio app initThe CLI walks you through interactive prompts:
- Select a project — Choose the Developer Console project you created in Step 1.
- Select a workspace — Choose
Development(or your workspace name). - Select a template — Choose
@adobe/generator-app-remote-mcp-server-generic(Remote MCP Server). - Project folder name — e.g.
my-agentic-app. - App name — A display name for your application.
When complete, the CLI downloads the workspace configuration and scaffolds the project.
Alternatively, pass the folder name directly:
aio app init my-agentic-appWhat Gets Generated
After aio app init, your project directory looks like this:
my-agentic-app/
├── actions/
│   └── mcp-server/
│       ├── index.js          # Main MCP server action (entry point)
│       ├── tools.js          # Tool, resource, and prompt registrations
│       └── validator.js      # IMS / API key authentication
├── test/                     # Jest test suite
├── app.config.yaml           # I/O Runtime deployment configuration
├── package.json              # Dependencies (MCP SDK, Zod, aio-sdk)
├── webpack.config.js         # Build configuration for the action bundle
├── jest.config.js            # Test configuration
├── .env.example              # Environment variable template
└── .aio                      # Workspace config (gitignored)
Key files to know
app.config.yaml — Defines how your MCP server deploys to I/O Runtime:
application:
  actions: actions
  runtimeManifest:
    packages:
      my-agentic-app:
        actions:
          mcp-server:
            function: actions/mcp-server/index.js
            web: 'yes'
            runtime: 'nodejs:20'
            annotations:
              raw-http: true        # Required for MCP Streamable HTTP
              web-export: true
actions/mcp-server/tools.js — Where you register MCP capabilities. The template ships with sample tools (echo, calculator, weather), resources, and prompts.
actions/mcp-server/index.js — The I/O Runtime action entry point. It creates a stateless MCP server per request using Streamable HTTP transport.
package.json — Core dependencies:
{
  "dependencies": {
    "@adobe/aio-sdk": "^5.0.0",
    "@modelcontextprotocol/sdk": "^1.24.0",
    "zod": "^3.23.8"
  }
}
Built-in capabilities (out of the box)
The generated template includes working examples:
| Capability | Name | Purpose |
|---|---|---|
| Tool | echo | Test connectivity — echoes a message back |
| Tool | calculator | Evaluate math expressions |
| Tool | weather | Mock weather API (pattern for external integrations) |
| Resource | example://text | Static text content |
| Resource | example://docs | Markdown documentation |
| Prompt | weather-info | Reusable weather prompt template |
These are starting points you’ll replace or extend when building Agentic Apps.
Connect Your Workspace
After generation, link the project to your Developer Console workspace (if not done automatically during init):
cd my-agentic-app
aio app use
Select your project and workspace. This writes a .env file with runtime credentials (AIO_RUNTIME_NAMESPACE, AIO_RUNTIME_AUTH, etc.).
Install dependencies:
npm installAt this point you have a fully scaffolded MCP server project, connected to your Adobe I/O Runtime workspace, ready to deploy.
4. Deploy to Adobe I/O Runtime
The generated template includes a webpack build and deploy script. From your project directory:
npm run deployThis runs two steps:
- Build — Webpack bundles
actions/mcp-server/index.jsintodist/for I/O Runtime - Deploy —
aio app deployuploads the bundle and appliesapp.config.yaml
When deploy completes, the CLI prints your web action URLs. Note the URL for the mcp-server action — you will need it for host configuration.
Deployed URL format
I/O Runtime web actions follow this pattern:
https://<namespace>.adobeioruntime.net/api/v1/web/<package-name>/mcp-server| Segment | Source |
|---|---|
<namespace> | Your I/O Runtime namespace (from .env, set by aio app use) |
<package-name> | The package key in app.config.yaml (e.g. my-agentic-app) |
mcp-server | The action name in app.config.yaml |
Example
https://123456-myproject-dev.adobeioruntime.net/api/v1/web/my-agentic-app/mcp-serverYou can also list deployed actions at any time:
aio runtime action list5. Verify the Deployment
Confirm the server is reachable before connecting an MCP host.
Health check (GET)
The template responds to GET requests with a JSON health payload:
curl https://<namespace>.adobeioruntime.net/api/v1/web/<package-name>/mcp-serverExpected response:
{
  "status": "healthy",
  "server": "my-agentic-app",
  "version": "1.0.0",
  "transport": "StreamableHTTP",
  "sdk": "@modelcontextprotocol/sdk",
  "timestamp": "2026-07-16T12:00:00.000Z"
}
A 200 response with "status": "healthy" confirms the action is deployed and responding.
Run the test suite
The template includes Jest tests for health checks, CORS, and MCP protocol handling:
npm testTests exercise the action locally by calling main() with simulated I/O Runtime parameters — no deploy required, but passing tests is a good signal before you connect a host.
MCP protocol check (optional)
Send an MCP initialize request directly to the deployed endpoint:
curl -X POST \
  https://<namespace>.adobeioruntime.net/api/v1/web/<package-name>/mcp-server \
  -H "Content-Type: application/json" \
  -d '{
    "jsonrpc": "2.0",
    "id": 1,
    "method": "initialize",
    "params": {
      "protocolVersion": "2024-11-05",
      "capabilities": {},
      "clientInfo": { "name": "curl-test", "version": "1.0.0" }
    }
  }'
A successful response includes "protocolVersion": "2024-11-05" and serverInfo in the result.
List the built-in tools:
curl -X POST \
  https://<namespace>.adobeioruntime.net/api/v1/web/<package-name>/mcp-server \
  -H "Content-Type: application/json" \
  -d '{
    "jsonrpc": "2.0",
    "id": 2,
    "method": "tools/list",
    "params": {}
  }'
You should see echo, calculator, and weather in the tool list.
6 Configure Your MCP Host
Connect Cursor or Claude Desktop to your deployed server using Streamable HTTP transport.
Replace <namespace> and <package-name> with your own values. For initial testing, leave authentication disabled in .env (both AUTH_VALIDATE_IMS and SERVICE_API_KEY unset). See Part 2 for securing the server before production.
Cursor
Open Cursor Settings → MCP (or edit your MCP config file) and add:
{
  "mcpServers": {
    "my-mcp-server": {
      "url": "https://<namespace>.adobeioruntime.net/api/v1/web/<package-name>/mcp-server",
      "type": "streamable-http"
    }
  }
}
Restart Cursor after saving. The server should appear in the MCP panel with a green connected status.
Test prompt
What’s the weather in Noida right now?
Or something that exercises the echo tool:
Repeat this back to me: “Hello from App Builder”.
Claude Desktop
Claude Desktop uses stdio by default, so route Streamable HTTP through mcp-remote. Add to your Claude Desktop MCP config (claude_desktop_config.json):
{
  "mcpServers": {
    "my-mcp-server": {
      "command": "npx",
      "args": [
        "mcp-remote",
        "https://<namespace>.adobeioruntime.net/api/v1/web/<package-name>/mcp-server"
      ]
    }
  }
}
Restart Claude Desktop, then try:
What’s the weather like in London?
Troubleshooting host connections
| Symptom | Likely cause | Fix |
|---|---|---|
| Host shows disconnected | Wrong URL or namespace | Confirm URL from aio app deploy output or aio runtime action list |
| Health check works, host fails | Missing type: streamable-http in Cursor | Add the transport type explicitly |
| Claude Desktop cannot connect | Direct URL without mcp-remote | Use the npx mcp-remote wrapper shown above |
| CORS errors in browser clients | Preflight blocked | Template handles OPTIONS; verify raw-http: true in app.config.yaml |
What’s Next — Part 2 Preview
In Part 2, we’ll transform this deployed MCP server into a full Agentic App:
- Add
@modelcontextprotocol/ext-appsfor interactive UI support - Build an HTML UI with Vite and
vite-plugin-singlefile - Register an Agentic App tool linked to a UI resource via
_meta.ui.resourceUri - Configure environment variables for your data source
- Redeploy and test the interactive UI in Cursor
- Secure the server with API key or IMS authentication
Summary
In Part 1, we:
- Introduced Agentic Apps — MCP tools paired with interactive HTML UIs
- Explained why Adobe App Builder is a strong fit for serverless MCP hosting
- Created a Developer Console project with I/O Runtime enabled
- Installed the Adobe I/O CLI and authenticated
- Generated a project with
aio app initusing the official Remote MCP Server template - Reviewed the scaffolded project structure and its built-in capabilities
- Deployed the MCP server with
npm run deploy - Verified the deployment with health checks and MCP protocol requests
- Configured Cursor and Claude Desktop to test the live server
You now have a deployed, verified MCP server on App Builder. Part 2 picks up from here and turns it into an interactive Agentic App.

