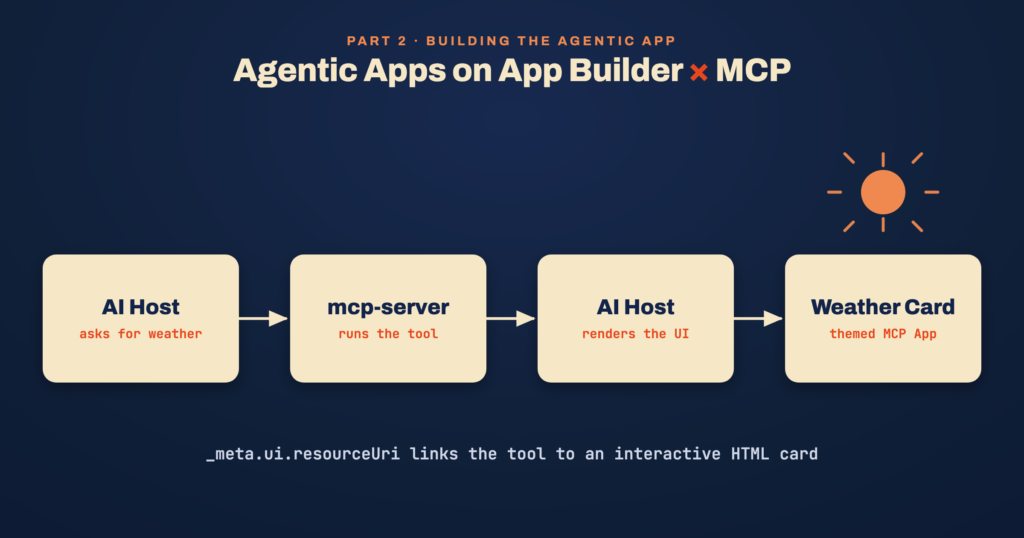
Building the Agentic App — turning a plain MCP tool into an interactive HTML experience the host renders inline.
In Part 1, we scaffolded an MCP server with aio app init using the @adobe/generator-app-remote-mcp-server-generic template. That template ships three sample tools – echo, calculator, and weather – but weather only returns a text summary, there’s no UI.
This part turns weather into an Agentic App: a tool that still returns structured data, but also renders an interactive HTML card inside the MCP host – themed and animated to match the reported condition (sun, clouds, rain, snow), with a search box that lets you check another city without leaving the card.
1. Add MCP Apps Dependencies
Part 1 already gave you @adobe/aio-sdk, @modelcontextprotocol/sdk, and zod from the generator template. Add the MCP Apps extension and the dev dependencies needed to build the UI:
npm install @modelcontextprotocol/ext-apps
npm install -D vite vite-plugin-singlefile typescript
Your package.json should now include:
{
  "dependencies": {
    "@adobe/aio-sdk": "^5.0.0",
    "@modelcontextprotocol/ext-apps": "^1.7.5",
    "@modelcontextprotocol/sdk": "^1.24.0",
    "zod": "^3.23.8"
  },
  "devDependencies": {
    "vite": "^8.1.5",
    "vite-plugin-singlefile": "^2.3.3",
    "typescript": "^7.0.2"
  }
}
2. Project Layout for the UI
Add an app-ui source folder alongside your server action:
actions/mcp-server/
├── index.js
├── tools.js
├── validator.js
├── embedded-ui.js             # Generated - do not edit (npm run embed:ui)
├── app-ui/                    # MCP App UI source
│   ├── vite.config.mjs
│   ├── tsconfig.json
│   └── src/
│       ├── global.css
│       └── weather/
│           ├── weather.html
│           ├── weather.ts
│           └── weather.css
└── static/                    # Generated - single-file HTML bundles (gitignored)
    └── weather.html
Each MCP App view gets its own subfolder under app-ui/src/. weather is the only one the template ships with, but the build is set up so adding more is just a matter of adding another folder – see Extending to Multiple Views.
3. Build the UI with Vite
Create actions/mcp-server/app-ui/vite.config.mjs:
import path from 'path'
import { fileURLToPath } from 'url'
import { defineConfig } from 'vite'
import { viteSingleFile } from 'vite-plugin-singlefile'

const __dirname = path.dirname(fileURLToPath(import.meta.url))
// APP selects which UI to build. Each MCP App UI lives under src/<app-name>/<app-name>.html
// (see scripts/build-ui.js, which builds every one of them by setting this env var in turn).
const APP = process.env.APP || 'weather'
const appRoot = path.join(__dirname, 'src', APP)
export default defineConfig({
  root: appRoot,
  plugins: [viteSingleFile()],
  build: {
    outDir: path.join(__dirname, '../static'),
    emptyOutDir: false,
    rollupOptions: {
      input: path.join(appRoot, `${APP}.html`)
    }
  }
})
vite-plugin-singlefile inlines all CSS and JavaScript into one HTML file. That matters on I/O Runtime: the deployed action bundle is the only artifact that ships to production.
Instead of hardcoding a build command per view, scripts/build-ui.js discovers every folder under app-ui/src/ and builds each one by setting APP in turn:
scripts/build-ui.js
const appUiSrcDir = path.join(__dirname, '../actions/mcp-server/app-ui/src')
const configPath = path.join(__dirname, '../actions/mcp-server/app-ui/vite.config.mjs')
const viteBin = path.join(__dirname, '../node_modules/.bin/vite')

const appNames = fs.readdirSync(appUiSrcDir, { withFileTypes: true })
  .filter((entry) => entry.isDirectory())
  .map((entry) => entry.name)
  .filter((name) => fs.existsSync(path.join(appUiSrcDir, name, `${name}.html`)))
  .sort()
for (const name of appNames) {
  console.log(`\n> Building ${name}`)
  execFileSync(viteBin, ['build', '--config', configPath], {
    stdio: 'inherit',
    env: { ...process.env, APP: name }
  })
}
Add build scripts to package.json:
{
  "scripts": {
    "build": "npm run build:ui && npm run embed:ui && webpack",
    "build:ui": "node scripts/build-ui.js",
    "embed:ui": "node scripts/embed-ui.js",
    "deploy": "npm run build && aio app deploy",
    "start": "node local-server.js"
  }
}
Why an embed script?
Adobe I/O Runtime deploys a single webpack bundle. Static files in actions/mcp-server/static/ are not deployed alongside the action. scripts/embed-ui.js solves this by discovering every built HTML file and inlining it into a JS module the server can require():
scripts/embed-ui.js
const staticDir = path.join(__dirname, '../actions/mcp-server/static')
const outPath = path.join(__dirname, '../actions/mcp-server/embedded-ui.js')
const toCamelCase = (stem) => stem.replace(/-([a-z0-9])/gi, (_, c) => c.toUpperCase())

const embedded = {}
for (const filename of fs.readdirSync(staticDir).filter((f) => f.endsWith('.html'))) {
  const key = `${toCamelCase(filename.replace(/\.html$/, ''))}Html`
  embedded[key] = fs.readFileSync(path.join(staticDir, filename), 'utf8')
}
fs.writeFileSync(outPath, `module.exports = ${JSON.stringify(embedded, null, 2)}\n`)
weather.html becomes the key weatherHtml in embedded-ui.js – the same key tools.js passes to loadUiHtml() (Step 6). At request time, the server prefers this embedded HTML; during local dev it falls back to reading files from static/ if the embed step hasn’t run yet.
4. Create the HTML Shell
weather.html is a minimal shell. The TypeScript entry point owns all dynamic behavior:
<!DOCTYPE html>
<html lang="en">
<head>
  <meta charset="UTF-8">
  <meta name="viewport" content="width=device-width, initial-scale=1.0">
  <meta name="color-scheme" content="light dark">
  <title>Weather</title>
</head>
<body>
  <main class="main" id="main" data-category="loading">
    <div class="weather-fx" id="fx" aria-hidden="true"></div>

    <div class="search-row">
      <input type="text" id="city-input" class="city-input" placeholder="Check another city…" aria-label="City name">
      <button type="button" id="search-btn" class="btn-search">Search</button>
    </div>

    <section class="card" id="card" data-state="loading">
      <header class="card-header">
        <div class="location">
          <h1 class="city-name" id="city-name">—</h1>
          <p class="country-name" id="country-name"></p>
        </div>
        <div class="icon-wrap" id="icon-wrap">
          <!-- one .icon per condition (sun/cloud/rain/snow/loading) - CSS shows only
               the one matching main[data-category]; see weather.css -->
        </div>
      </header>

      <div class="temp-row">
        <span class="temperature" id="temperature">--°</span>
        <span class="condition" id="condition">—</span>
      </div>

      <dl class="details-grid" id="details-grid">
        <div class="detail"><dt>Humidity</dt><dd id="detail-humidity">—</dd></div>
        <div class="detail"><dt>Wind</dt><dd id="detail-wind">—</dd></div>
        <div class="detail"><dt>Pressure</dt><dd id="detail-pressure">—</dd></div>
        <div class="detail"><dt>Visibility</dt><dd id="detail-visibility">—</dd></div>
        <div class="detail"><dt>UV Index</dt><dd id="detail-uv">—</dd></div>
      </dl>

      <p class="updated" id="updated"></p>
    </section>

    <p class="error-message" id="error-message" hidden></p>
  </main>
  <script type="module" src="./weather.ts"></script>
</body>
</html>
5. Implement the MCP App Client
The client-side code uses the App class from @modelcontextprotocol/ext-apps. Register lifecycle handlers before calling connect():
import {
  App,
  applyDocumentTheme,
  applyHostFonts,
  applyHostStyleVariables,
  type McpUiHostContext,
} from "@modelcontextprotocol/ext-apps";
import type { CallToolResult } from "@modelcontextprotocol/sdk/types.js";
import "../global.css";
import "./weather.css";

const mainEl = document.getElementById("main") as HTMLElement;
const cardEl = document.getElementById("card") as HTMLElement;
const errorMessage = document.getElementById("error-message") as HTMLParagraphElement;
const cityInput = document.getElementById("city-input") as HTMLInputElement;
const searchBtn = document.getElementById("search-btn") as HTMLButtonElement;
// ...remaining detail-grid element refs (temperature, humidity, wind, pressure, etc.)

type WeatherStructured = {
  city: string;
  country: string;
  category: "sunny" | "cloudy" | "rain" | "snow";
  condition: string;
  temperature: number;
  humidity: number;
  windSpeed: number;
  pressure: number;
  visibility: number;
  uvIndex: number;
  lastUpdated: string;
};

// Default/reset state - shown from first paint and reapplied before any re-fetch, so a
// request in flight always looks like "loading", never like stale or unrelated data.
function setLoadingState() {
  errorMessage.hidden = true;
  cardEl.hidden = false;
  cardEl.dataset.state = "loading";
  mainEl.dataset.category = "loading";
}

function renderWeather(structured: WeatherStructured) {
  errorMessage.hidden = true;
  cardEl.hidden = false;
  mainEl.dataset.category = structured.category; // CSS themes sun/cloud/rain/snow off this
  // ...populate temperature/condition/humidity/wind/pressure/visibility/uv text content
  cardEl.dataset.state = "ready"; // flips the loading skeleton off
}

function showError(message: string) {
  cardEl.hidden = true;
  errorMessage.textContent = message;
  errorMessage.hidden = false;
}

function applyToolResult(result: CallToolResult) {
  if (result.isError) {
    const content = result.content ?? [];
    const textItem = content.find((c): c is { type: "text"; text: string } => c.type === "text");
    showError(textItem?.text ?? "An error occurred.");
    return;
  }
  const structured = result.structuredContent as WeatherStructured | undefined;
  if (structured) renderWeather(structured);
}

function handleHostContextChanged(ctx: McpUiHostContext) {
  if (ctx.theme) applyDocumentTheme(ctx.theme);
  if (ctx.styles?.variables) applyHostStyleVariables(ctx.styles.variables);
  if (ctx.styles?.css?.fonts) applyHostFonts(ctx.styles.css.fonts);
}

const app = new App({ name: "Weather App", version: "1.0.0" });

app.onteardown = async () => ({});
app.ontoolinput = () => setLoadingState();
app.ontoolresult = applyToolResult;
app.onerror = console.error;
app.onhostcontextchanged = handleHostContextChanged;

async function searchCity() {
  const city = cityInput.value.trim();
  if (!city) return;
  setLoadingState();
  try {
    const result = await app.callServerTool({ name: "weather", arguments: { city } });
    applyToolResult(result);
  } catch (e) {
    showError(e instanceof Error ? e.message : "Weather request failed.");
  }
}

searchBtn.addEventListener("click", () => void searchCity());
cityInput.addEventListener("keydown", (e) => { if (e.key === "Enter") searchBtn.click(); });

// Connect to the host - triggers the initial tool invocation
app.connect().then(() => {
  const ctx = app.getHostContext();
  if (ctx) handleHostContextChanged(ctx);
});
How the UI talks to the server

callServerTool is for UI actions that should re-run a tool without involving the agent. sendMessage becomes useful once your Agentic App has more than one view and needs the agent to navigate between them.
6. Register the Tool on the Server
In actions/mcp-server/tools.js, the weather tool from Part 1 gets a _meta.ui.resourceUri link and an outputSchema:
const fs = require('fs/promises')
const path = require('path')
const { z } = require('zod')

// Adobe I/O Runtime only deploys the bundled index.js - no sibling static/ files - so the
// weather UI must ride inside the bundle as a required JS string (see scripts/embed-ui.js,
// run via `npm run embed:ui` as part of `npm run build`). Falls back to reading
// actions/mcp-server/static/ on disk for local dev when the embed step hasn't run yet.
let embeddedUi = null
try {
  embeddedUi = require('./embedded-ui.js')
} catch {
  // Local dev without embed step
}
async function loadUiHtml(filePath, embeddedKey) {
  const embedded = embeddedUi?.[embeddedKey]
  if (typeof embedded === 'string' && embedded.length > 0) return embedded
  return fs.readFile(filePath, 'utf-8')
}
const WEATHER_RESOURCE_URI = 'ui://weather/mcp-app.html'
const WEATHER_RESOURCE_MIME_TYPE = 'text/html;profile=mcp-app'
function registerTools(server) {
  // ...echo and calculator tools from Part 1 stay as-is...
  server.registerTool(
    'weather',
    {
      title: 'Weather',
      description: 'Get current weather information for any city.',
      inputSchema: {
        city: z.string().describe('Name of the city to get weather for (e.g., "London")')
      },
      outputSchema: {
        city: z.string(),
        country: z.string(),
        category: z.enum(['sunny', 'cloudy', 'rain', 'snow']),
        condition: z.string(),
        temperature: z.number(),
        humidity: z.number(),
        windSpeed: z.number(),
        pressure: z.number(),
        visibility: z.number(),
        uvIndex: z.number(),
        lastUpdated: z.string()
      },
      // Links this tool's result to the weather app-ui resource registered below.
      // Both keys point at the same URI - `ui/resourceUri` is kept for hosts that
      // haven't picked up the nested `ui.resourceUri` shape yet.
      _meta: {
        ui: { resourceUri: WEATHER_RESOURCE_URI },
        'ui/resourceUri': WEATHER_RESOURCE_URI
      }
    },
    async ({ city = 'Unknown City' }) => {
      // CUSTOMIZE: replace with a real weather API call. This generates mock data -
      // a category (sunny/cloudy/rain/snow, weighted so sun/clouds are most common)
      // and a plausible temperature/humidity/wind/etc. within that category's range.
      const structuredContent = generateMockWeather(city)
      return {
        content: [{ type: 'text', text: `Weather for ${city}: ${structuredContent.condition}, ${structuredContent.temperature}°C` }],
        structuredContent
      }
    }
  )
}
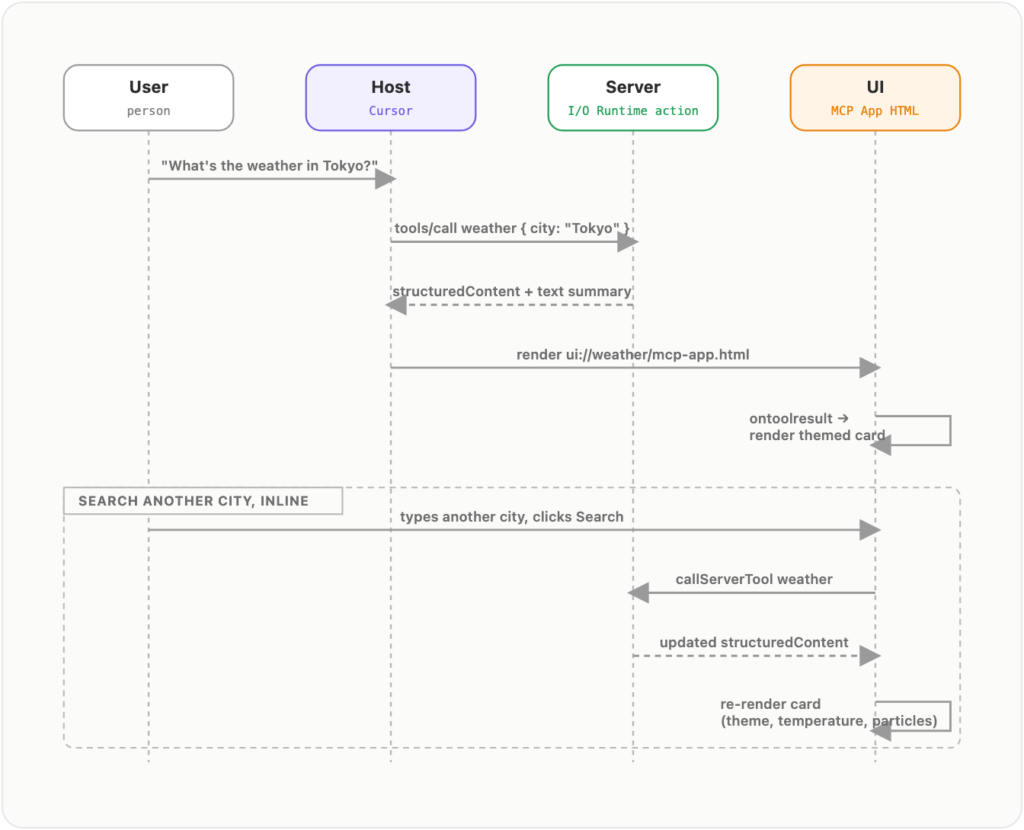
The critical part is _meta.ui.resourceUri. Without it, the host returns text only – no UI panel.
Return both:
content– human-readable text for the LLM conversation (and for hosts without MCP App UI support)structuredContent– typed data consumed by your HTML UI viaontoolresult
7. Register the UI Resource
Register the HTML resource that the host renders:
function registerResources(server) {
  // ...other resources from Part 1 (example-resource-1, docs://api, config://settings)...
  // Weather app-ui - serves the bundled HTML/CSS/JS card that the `weather` tool
  // links to via `_meta.ui.resourceUri` (see registerTools above).
  server.registerResource(
    WEATHER_RESOURCE_URI,
    WEATHER_RESOURCE_URI,
    { mimeType: WEATHER_RESOURCE_MIME_TYPE },
    async () => {
      const html = await loadUiHtml(
        path.join(__dirname, 'static', 'weather.html'),
        'weatherHtml'
      )
      return {
        contents: [{
          uri: WEATHER_RESOURCE_URI,
          mimeType: WEATHER_RESOURCE_MIME_TYPE,
          text: html
        }]
      }
    }
  )
}
This card is pure CSS/JS with no external images, so the resource doesn’t need a CSP allowlist. If your own MCP App UI loads external images or fonts, declare the allowed origins under _meta.ui.csp.resourceDomains on contents[0].
8. Build and Run Locally
Build the full pipeline:
npm run build
npm start
local-server.js wraps your I/O Runtime action in a plain HTTP server on port 9080, translating each request into the __ow_* params shape main() expects and loading LOG_LEVEL, SERVICE_API_KEY, and AUTH_VALIDATE_IMS from .env.
Connect Cursor
Add to your Cursor MCP settings:
{
  "mcpServers": {
    "agentic-app-local": {
      "url": "http://localhost:9080",
      "type": "streamable-http"
    }
  }
}
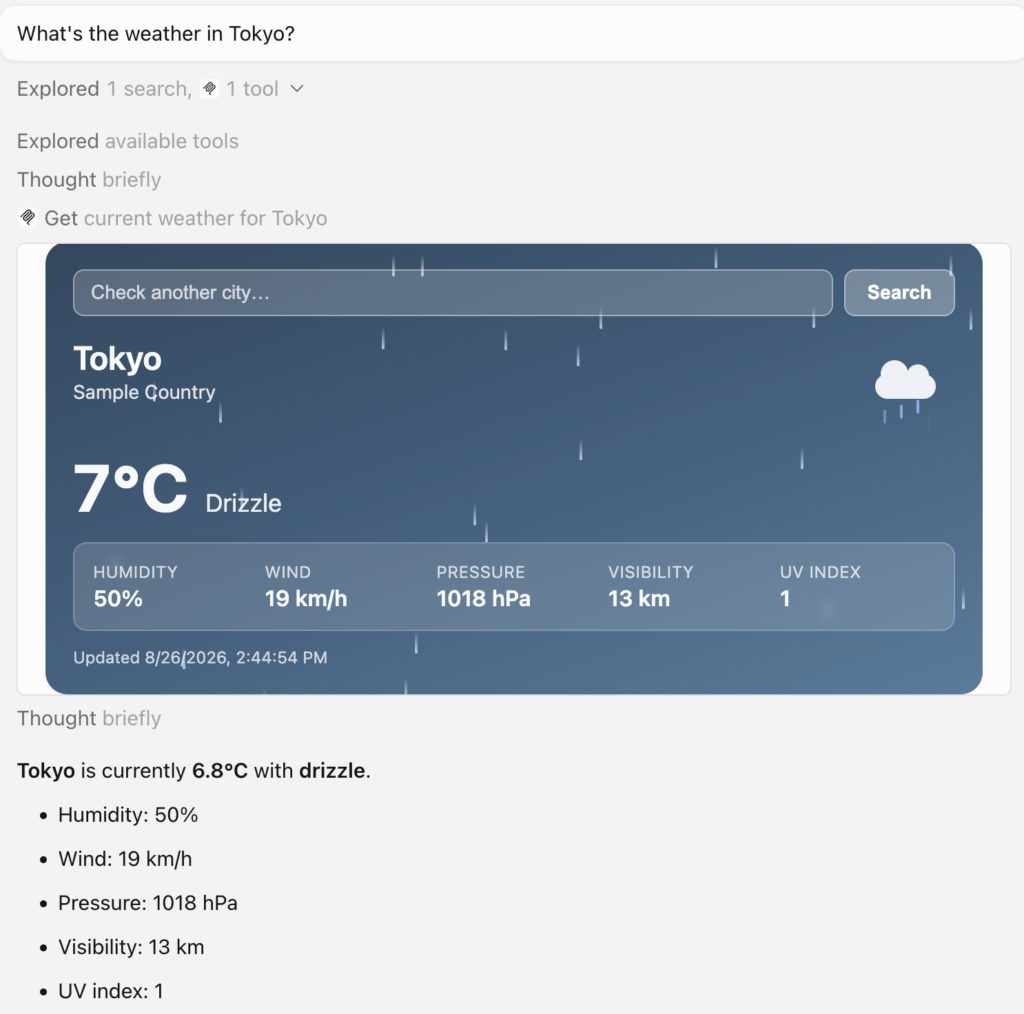
Restart Cursor, then ask:
What’s the weather in Tokyo?
The host invokes weather, your server generates the data, and the themed weather card renders inside the conversation.
9. Deploy to Adobe I/O Runtime
The build pipeline now bundles the weather UI along with the action code. Redeploy the same way you did in Part 1:
npm run deployThis re-runs build:ui → embed:ui → webpack, then aio app deploy uploads the updated bundle. The deployed URL is unchanged from Part 1:
https://<namespace>.adobeioruntime.net/api/v1/web/<package-name>/mcp-serverPoint Cursor at the deployed URL instead of localhost:9080:
{
  "mcpServers": {
    "my-agentic-app": {
      "url": "https://<namespace>.adobeioruntime.net/api/v1/web/<package-name>/mcp-server",
      "type": "streamable-http"
    }
  }
}
Or Claude Desktop, via mcp-remote:
{
  "mcpServers": {
    "my-agentic-app": {
      "command": "npx",
      "args": [
        "mcp-remote",
        "https://<namespace>.adobeioruntime.net/api/v1/web/<package-name>/mcp-server"
      ]
    }
  }
}
ChatGPT
ChatGPT doesn’t take a JSON config file — connectors are added through the UI, and only over HTTPS, which is why this is the first host we can wire up ChatGPT for:
- In ChatGPT, go to Settings → Plugins → Advanced settings (some accounts show this under Settings → Security and login) and turn on Developer mode. This unlocks custom, unverified connectors.
- Back in Settings → Plugins, click Create.
- Enter a name and description, then paste your deployed MCP server URL:
https://<namespace>.adobeioruntime.net/api/v1/web/<package-name>/mcp-server - For Authentication, choose No authentication — it matches the unset
SERVICE_API_KEY/AUTH_VALIDATE_IMSfrom this part. - Save, then enable the connector from the + menu in a chat (or under Deep Research) so
weatheris available as a tool.
ChatGPT implements the same MCP Apps standard this server already uses (_meta.ui.resourceUri), so the themed card should render there too, not just the text summary.
Ask the same test prompt again in each host — the live server should render the identical weather card:
What’s the weather in Tokyo?

None of these configs send credentials, because SERVICE_API_KEY and AUTH_VALIDATE_IMS are still unset – the deployed URL is open to anyone who has it. That’s fine for testing, but not for production. Part 3 covers turning on authentication before you rely on this deployment.
End-to-End Flow
Extending to Multiple Views
Because scripts/build-ui.js discovers every folder under app-ui/src/, adding a second view is just a matter of:
- Adding
app-ui/src/<name>/<name>.{html,ts,css}– for exampleapp-ui/src/forecast/forecast.html - Registering a matching resource, e.g.
ui://forecast/mcp-app.html - Pointing a tool’s
_meta.ui.resourceUriat that resource
No changes to vite.config.mjs, build-ui.js, or embed-ui.js are needed – they pick up the new app by folder name and camelCase the embedded key automatically (forecast.html → forecastHtml).
Common Pitfalls

Summary
In Part 2, we:
- Added
@modelcontextprotocol/ext-appsfor interactive UI support - Laid out an
app-ui/source folder and a Vite build that inlines it into a single HTML file - Built the weather card UI —
weather.html,weather.ts,weather.css - Created embed scripts so HTML ships inside the serverless bundle
- Linked the
weathertool to its UI with_meta.ui.resourceUri - Registered the UI resource the host renders
- Implemented the MCP App client lifecycle (
ontoolresult,callServerTool,onhostcontextchanged) - Ran locally and tested in Cursor
- Deployed the updated bundle to Adobe I/O Runtime and reconnected Cursor, Claude Desktop, and ChatGPT to the live URL
You now have a working Agentic App deployed to I/O Runtime — but open to anyone with the URL. Part 3 covers locking it down with API key or IMS authentication.
